Using A+ Attendance
What are the default settings for student self check-in?
For student self-check-in, A+ Attendance uses the following default settings:
- Entry method: Rolling code
- Code refresh: Every 30 seconds
- Location requirement: Students must be on campus and connected to MIT Wi-Fi
Teaching teams can adjust these settings as needed for their course from the Attendance Codes screen.
If using a static code: The default check-in window is 5 minutes before the scheduled class start time through 15 minutes after class starts.
How do my students check in using a unique code on their devices?
Students can check in using the Canvas Student app on their iOS or Android devices or by accessing Canvas in a web browser on their laptop. They must be on campus and connected to MIT Wi-Fi to use student self check-in. Students enter the code displayed in the classroom to record their attendance.
For step-by-step instructions, see How to Check into A+ Attendance with a Unique Code as a Student.
What should I do if a student can’t check in?
If a student is physically present but cannot check in, manually mark their attendance in A+ Attendance.
First, ask the student to confirm that they are connected to MIT Wi-Fi and that the MIT VPN or another VPN is not turned on. A+ Attendance uses the MIT network to verify that students are checking in from campus.
If the student is connected to MIT Wi-Fi, does not have a VPN turned on, and sees a “Network access restricted” error, ask them to follow How to Troubleshoot the “Network Access Restricted” Error in A+ Attendance as a Student.
Students cannot check themselves in after the check-in window closes, but teaching teams can update their attendance manually at any time.
If the student still can’t check in after troubleshooting, or is having trouble connecting to MIT Wi-Fi, they can submit a ticket to the STS Help Desk by emailing stshelp@mit.edu or calling 617-253-2000. If they’re receiving an error message, ask them to include a screenshot of what they’re seeing so the team can help troubleshoot the issue.
What can my students see when clicking on A+ Attendance in the Course Navigation Menu?
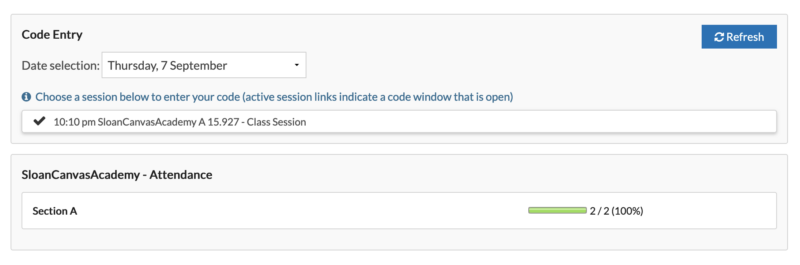
Students can see code entry options (when enabled by the teaching team) and how many times their attendance has been recorded thus far.
What are the available attendance statuses in A+ Attendance?
The following table provides example use cases and the point value for each attendance status:
|
Status |
Example Use Case |
Point Value |
|
Attended - On Time |
A student arrives at class promptly at 9:00 AM for a class that starts at 9:00 AM. |
1 |
|
Attended - Code |
A student checks in using a unique code provided at the beginning of the class session to verify attendance.
Note: This status is automatically applied when students check-in using a unique code. |
1 |
|
Attended - Late |
A student arrives at 9:15 AM for a class that started at 9:00 AM. |
1 |
|
Attended - Left Early |
A student, who initially attended the class on time, had to leave at 10:00 AM for a medical appointment. |
1 |
|
Attended - Other |
A student attends a live broadcast of the class from another location due to a conference commitment. |
1 |
|
Absent - Excused |
A student provides a doctor's note ahead of time stating they will be out sick and won't be attending class. |
1 |
|
Absent - Unexcused |
A student misses class without giving any prior notice or reason to the teaching team. |
0 |
|
Absent - Late |
A student arrives so late that they missed the majority of the class session, yet it wasn't long enough to be considered fully absent. For example, a student arrives at 10:15 AM for a class that started at 9:00 AM and lasts until 11:00 AM. |
0 |
|
Absent - Left Early |
A student attends the initial 10 minutes of a class and then leaves without notifying anyone and misses the majority of the class session. |
0 |
|
Absent - Other |
A student is on a school-sanctioned activity or trip and provides advanced notice but doesn't fit into the excused or unexcused categories. |
0 |
What happens if I leave a student’s attendance record unmarked (empty) for a class session?
IMPORTANT: In A+ Attendance, a student’s unmarked attendance records are not counted. For example, a student has an “Attended – On Time” status for two of three class sessions, but the third session remains unmarked. When this student clicks on A+ Attendance in the Course Navigation Menu, their attendance record will display as 2/2.
To ensure accuracy, make sure you’ve applied an attendance status (e.g., Attended – On Time, Absent – Excused) for each student in every class session.
How do I bulk apply attendance labels in A+ Attendance?
Bulk applying attendance labels is a time-saving feature in A+ Attendance that allows you to quickly fill in multiple attendance records after a class session. This is particularly useful for recording attendance for students who didn’t check in during class or for updating multiple records simultaneously.
- In your Canvas course, click on A+ Attendance in the Course Navigation Menu.
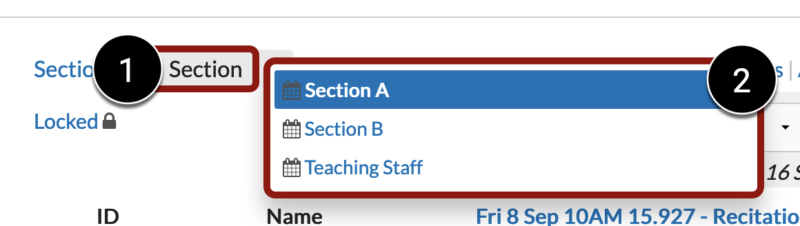
- In the top menu, click on the Section drop-down menu [1], and select the section that you want to take attendance for [2].
- Navigate to the class meeting date you want to take attendance for and click on the column header.
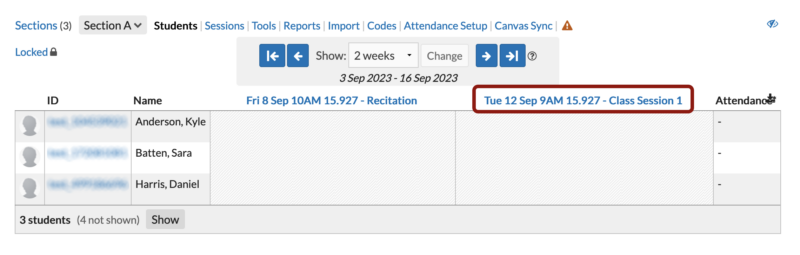
- Your class roster for the selected section will appear.
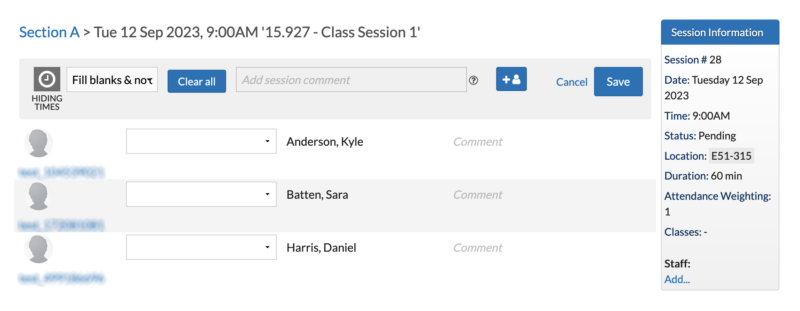
- Click the Fill Blanks & No Data drop-down menu.
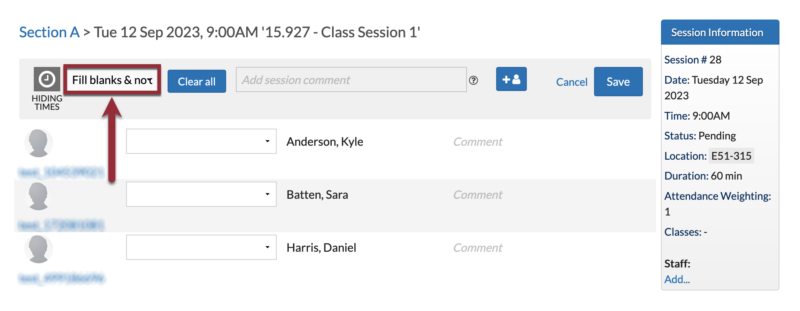
- Select the appropriate attendance status (e.g., Attended-Late, Absent-Excused).
- Click the Save button in the top-right corner of the screen to save your changes.

Important Notes:
- This process only affects empty attendance records, preserving any previously recorded data.
- You can use this feature multiple times with different statuses if needed.
- Always double-check your selection before saving to avoid errors.
How do I generate an attendance report in A+?
- In your Canvas course, click on A+ Attendance in the Course Navigation Menu.
- Click on Reports in the top menu.

- Choose the type of report you need (e.g., Attendance Summary, Attendance by Date, Attendance by Sequence, Comments, Date of Last Attended).
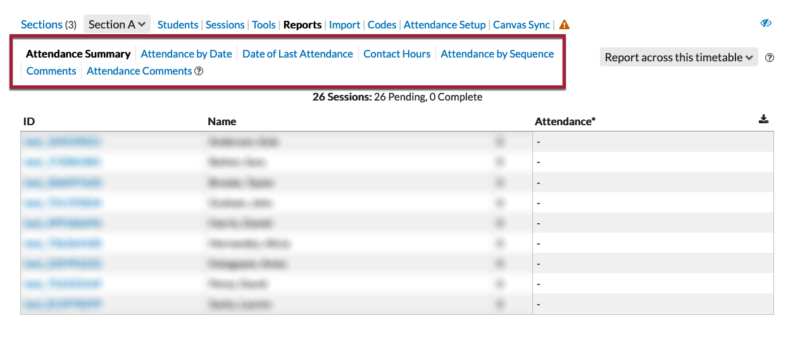
- Select your desired data range and columns.
- To export, click the Export icon in the top right of the data table.
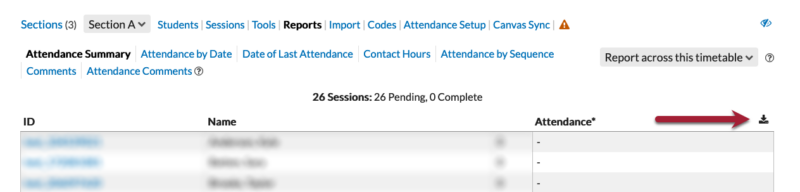
- Choose CSV or Excel format for your export.
To learn more, refer to Course Attendance Reports.
Which roles on our teaching team can access and use A+ Attendance in our Canvas site?
Access to A+ Attendance in your Canvas site is available to specific roles within the teaching team. These roles include:
- Teachers
- Primary Course Admins
- Course Admins
- Teaching Assistants (TAs)