At a Glance
A+ Attendance (also called aPlus+ Attendance) is MIT Sloan’s Canvas integration that allows teaching teams to track, manage, and sync student attendance data within your course.
Setup is required before you can take attendance. Getting it right ensures students can quickly check themselves in, teaching teams save time during and after class, and attendance data stays accurate—helping you avoid headaches later.
Every teaching team starts with the Initial Setup steps. From there, complete the Basic Setup instructions—recommended for nearly all MIT Sloan courses. Basic Setup enables student self check-in and gives the teaching team flexibility to mark each student’s attendance status during or after every class session.
If your course requires Gradebook syncing, session weighting, or penalty rules, see How to Set Up A+ Attendance (Advanced Options).
Before setting up A+ Attendance, discuss it with your faculty. If approved, attend our live training. In just 30 minutes, you’ll learn tips that save time and help you avoid common mistakes. After the training, follow this guide to set it up in your Canvas site.
Initial Setup (Required)
Follow the steps below to get your course set up for the term.
Step 1: Add Class Sessions to Your Canvas Calendar
One member of the teaching team must add the class sessions to your course’s calendar in Canvas. We suggest coordinating with your teaching team to determine who will schedule these calendar events (e.g., course meet times, recitation sessions, office hours).
For step-by-step instructions, see How to Add and Manage Calendar Events in Canvas.
While you’re setting up your calendar events, keep these tips in mind:
- Pro Tip #1: Use consistent session naming: Course number – Event type – Term and year. For example, 15.927 – Class Session – Spring 2026. This will help you import only your class meetings into A+ Attendance later.
- Pro Tip #2: Always check Use a different date for each section when adding Canvas Calendar events. Even if your course has only one student section, Sloan Canvas sites also include a Teaching Staff section. Selecting this option prevents any issues when importing your class sessions into A+ Attendance.
- Pro Tip #3: Do NOT add sections to calendar event titles—Canvas does this for you automatically. When you give each section its own event date, Canvas adds the section name to the title for you. For example, 15.927 – Class Session – Spring 2026 automatically becomes 15.927 – Class Session – Spring 2026 (Section A).
Step 2: Enable the Tool in Your Canvas Site
By default, the A+ Attendance tool is disabled. To start using this tool, enable it under Settings.

For step-by-step instructions, see How do I manage Course Navigation links?
Step 3: Configure Attendance Settings
Once A+ Attendance is enabled in your course, you’ll need to configure its settings. In most cases, you’ll use the Basic Setup—this imports your Canvas Calendar events, lets students check in on their own, and allows the teaching team to mark each student’s attendance status during or after every class session.
If your course requires more complex grading options (such as syncing with the Gradebook, weighting sessions by duration, or applying penalty rules), see How to Set Up A+ Attendance (Advanced Options).
Basic Setup
Most courses only need the Basic Setup. This configuration enables student self check-in and gives the teaching team flexibility to update attendance during or after each class.
Here’s how to complete the Basic Setup in your Canvas course:
- In your Canvas course, click on A+ Attendance in the Course Navigation Menu.
- When you open the tool, the Attendance Setup screen will appear. If you don’t see it, click Attendance Setup in the top menu.

- On the Attendance Setup screen:
- Select the Import Canvas course calendar events checkbox.
- Imports the class sessions you created in your Canvas Calendar.

- From the Imported session weighting drop-down menu, select Equal sessions for weighting.
- Treats all class sessions as the same value.
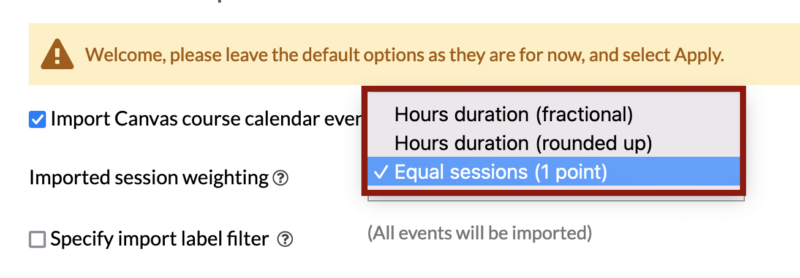
- Check Specify import label filter [1] and choose Only include events with matching labels [2].

- Ensures only your class meetings are imported (not office hours, assignments, or exams).
- Pro Tip #4: In the Labels field, type your class session title and add an asterisk at the end (e.g., 15.927 – Class Session – Spring 2026*). This will filter out non-class events (e.g., Office hours, assignments and exam due dates) and make sure only class sessions are imported.

- IMPORTANT: Select the Select additional instructor users checkbox and select all teaching assistants (TAs) in the list.

- Click the Apply button.

Optional: To record attendance in the Canvas Gradebook, select Record attendance as assignment grades. For step-by-step instructions, see How to Set Up A+ Attendance (Advanced Options).
Enabling this option automatically creates a Canvas assignment that appears on both the Assignments page and in your Gradebook. If your course uses a Manual Grade Posting Policy, students will not see their attendance scores from the A+ Attendance tool until you post the grades.
Verify Your Setup
Before taking attendance, use this checklist to ensure your A+ Attendance setup is complete and ready to go:
- A+ Attendance is enabled:
- Confirm A+ Attendance appears in your Canvas site’s Course Navigation Menu.
- Canvas Calendar sessions are set up correctly:
- You’ve added all class sessions to your Canvas Calendar.
- You checked Use a different date for each section when creating events.
- Look for the section name at the end of each event title.
- Attendance Setup choices match Basic Setup:
- Import Canvas course calendar events is selected.
- Equal sessions for weighting is selected.
- Specify import label filter and Only include events with matching labels are selected.
- In the Labels field, you entered your session title with an asterisk (e.g., 15.927 – Class Session – Spring 2026*).
- Only your class meetings have been imported into A+ Attendance (critical)
- In A+ Attendance > Sessions > [choose your Section], you only see class meetings—no office hours, assignment due dates, or exams.
- If other events appear, return to Attendance Setup and correct the label filter (use the label + * pattern above). See Pro Tip #3 above.
- IMPORTANT: After attendance is recorded, editing the Canvas calendar event will not update that session in A+ Attendance (to preserve the original attendance data). Re-importing may create a duplicate session. You can still add and import new calendar events—these will appear as new sessions.
- All TAs are added as additional instructor users:
- In Attendance Setup, you selected all TAs under Select additional instructor users so they can mark attendance statuses.
- Check your Grade Posting Policy (optional / advanced):
- When you sync A+ Attendance grades to the Canvas Gradebook, Canvas automatically creates an assignment for attendance that appears on both the Assignments page and in your Gradebook.
- Review your Grade Posting Policy to be sure it matches your teaching team’s preferences for when students can see their attendance grades.
- If you don’t want students to see attendance grades right away, set the Grade Posting Policy to Manual. Students will only see their grades after you post them.
How to Get Support
Get in touch with our team by submitting a ticket. We’ll get you to the resources and support you need right away.


