At a Glance
Teaching a course with more than one section? Canvas makes it easy to manage them together in a single site—so you and your teaching team can stay coordinated without duplicating your work while still tailoring key items to individual sections. Here’s what you can do:
- Assign content to specific sections with different due dates and availability windows
- Create section-specific calendar events so students see only their class times
- Send targeted announcements to individual sections or all sections
- Move students between sections using the Membership Tool
- Filter your gradebook view by section for easier grading and management
- Export grades by section for final grade submission
In this guide for teaching teams, you’ll learn how to efficiently manage a single Canvas site with multiple sections.
Why Choose a Single Site for Multiple Sections?
When your course content is largely the same across sections, combining them in one Canvas site streamlines your workflow:
- Everything in one place: Manage content, grading, and communication without maintaining separate sites
- Flexible scheduling: Set different due dates and availability windows by section for assignments, quizzes, discussions, and pages
- Organized recordings: Section-specific classroom recordings are automatically organized into separate folders in the Videos tool
- Targeted communication: Choose whether announcements go to everyone or just specific sections
- Module management: Modules are visible to all sections by default, but you can restrict individual modules to specific sections when needed
By default, courses get the same Canvas site configuration from term-to-term unless you request a change. For example, if your two-section course shared a single Canvas site last term, we will give you a single site again this term. However, if you want each section to have its own Canvas site this term, that’s no problem. Contact us to request this change.
Assign Assignments, Quizzes, and Discussions to Specific Sections
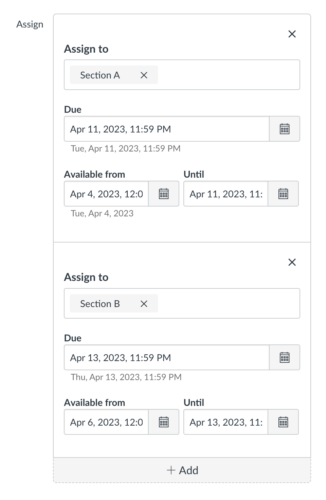
When creating assignments, quizzes, and graded discussions, you can assign them to specific sections and set different due dates and availability dates for each section.
How It Works
- Only students in the specified section(s) can view the assigned content.
- The assignment appears as a column for all students in the Gradebook.
- Grade cells are grayed out for students not in the assigned section(s).
- Grades cannot be entered for students who weren’t assigned the work.
- Unassigned work doesn’t factor into students’ overall grades.
Use Case
You manage Sections A and B in a single Canvas site. Section A meets Tuesdays, Section B meets Thursdays. You want assignment due dates that align with each section’s class schedule, so you set different due dates for the same assignment.
How-to Guides
Assign Pages to Specific Sections
By default, pages are assigned to everyone in the course. However, pages can be assigned to specific sections and set with different availability dates for each section. This allows you to share section-specific content, resources, or instructions.
How It Works
- Only students in the specified section(s) can view the assigned page.
- You can set different availability windows for each section.
Use Case
Section A has a guest speaker from Bain Capital, while Section B has a speaker from BlackRock. You can create section-specific pages with different speaker bios, relevant background readings, and preparation questions tailored to each presentation.
How-to Guides
Assign Modules to Specific Sections
By default, all modules are assigned to and visible to everyone in the course. However, you can assign modules to specific sections, enabling you to deliver section-specific content and activities.
How It Works
- Students assigned to a module can view all items within that module unless they are explicitly not assigned to individual items.
- Students assigned only to specific items within a module will not see the module itself, but can access those items from their respective pages (Assignments, Pages, Quizzes, etc.)—as long as the corresponding tools are enabled in the Course Navigation Menu.
- If a student is assigned to an entire module but only certain items within it, they will only see the assigned items when viewing the module.
Use Case
During Week 4 of your course, Section A covers advanced data modeling, while Section B focuses on business ethics. To support these differing instructional plans, you can create section-specific modules so that each section accesses only the readings, assignments, and activities relevant to their topic—streamlining the student experience and reducing confusion.
How-to Guides
Create Section-Specific Calendar Events
Students rely on the Canvas calendar to know when and where their classes meet. Canvas calendar events are manually created and managed by the teaching team. When you have multiple sections in your Canvas site, create separate calendar events for each section so students only see their relevant class times.
Key Points to Remember
- Create a separate event for each section, even if the meetings are recurring.
- Create a separate event for each meeting day if a section meets multiple days per week.
- Each section will have its own calendar event, and only students in the specified section(s) will see it on their Canvas calendar.
How-to Guides
Move Students Between Sections
Canvas enrollments are automated to reflect a student’s official registration at MIT. Students can confirm their enrollment status in WebSIS.
The Membership Tool lets you move students between sections within the same Canvas course. Changes are automatically reported to Sloan Educational Services (SES), who update the student’s registration in MIT’s official records.
If a student needs to move to a section in a different Canvas site, contact Sloan Educational Services at edservices.mitsloan@mit.edu.
How It Works
- Use the Membership Tool to move students between sections within the same Canvas course.
- Changes are automatically reported to SES.
- Updates appear in WebSIS within 24–48 hours.
- Students are automatically enrolled in the new section and removed from the old one.
Use Case
A student currently in Section A requests to move to Section B. You make the change in the Membership Tool, and their registration is updated automatically within 24–48 hours.
How-to Guides
Post Section-Specific Announcements
By default, announcements are sent to all sections in the course. However, you can send announcements to specific sections only. This allows you to share section-specific updates, reminders, or logistics.
How It Works
- By default, announcements are posted to all sections.
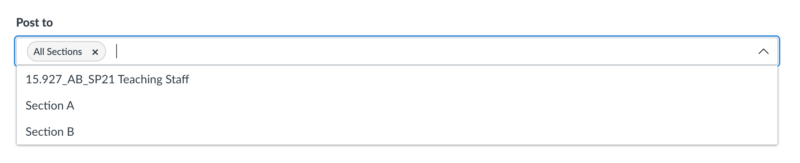
- To send an announcement to specific sections, use the Post to drop-down menu when creating the announcement.
- Only students in the selected section(s) will receive the announcement and see it in Canvas.
Use Case
You need to announce a room change that only affects Section B, or you want to share guest speaker details that apply only to Section A.
How-to Guide
Filter Your Gradebook by Section
You can use the Filters menu in the Gradebook to view students from one section at a time. This is especially useful when different TAs are assigned to different sections.
How It Works
- Use the Filters menu to display one section at a time in the Gradebook.
- When a section is filtered in the Gradebook, SpeedGrader also shows submissions for that section only.
- This creates a more focused and efficient grading experience.
Use Case
Different TAs are assigned to each section. The TA for Section A can filter their Gradebook view to see only the students they’re responsible for grading.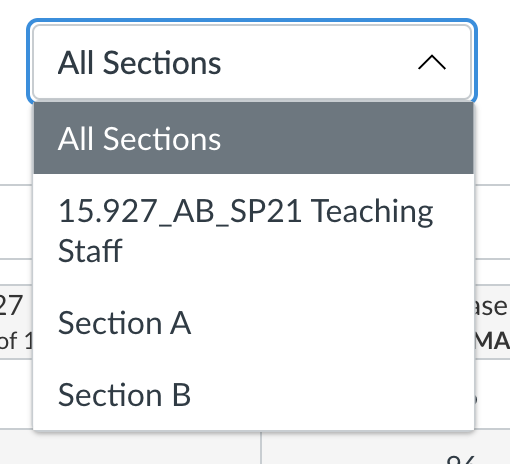
How-to Guide
Export Grades by Section
By default, the MITSIS Grade Export Tool displays students from all sections in a single list. However, you can filter by section to simplify final grade entry.
How It Works
- Open the MITSIS Grade Export Tool in your Canvas site.
- Use the filter option to display students from a single section.

- Enter and export final grades section by section.
Use Case
You prefer to enter final grades one section at a time. Filter the tool to show only Section A students, complete their grades, then switch to Section B.
How-to Guide


