At a Glance

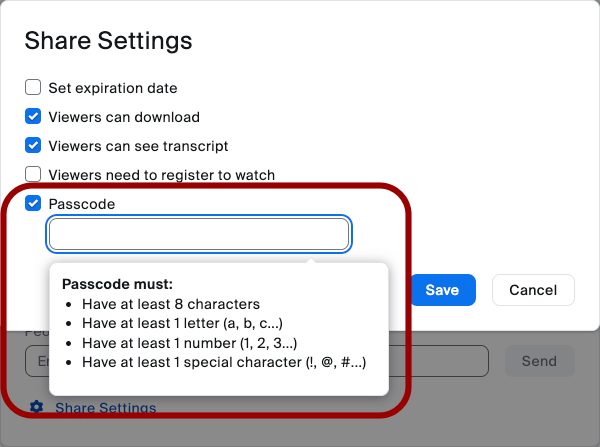
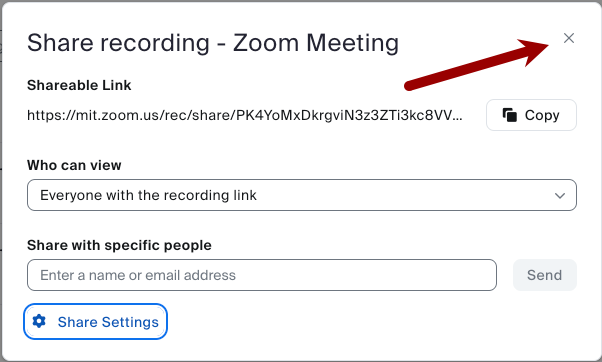
This guide for teaching teams explains how to add or remove passcode protection for a Zoom recording scheduled outside of Canvas (i.e., not using the Zoom tool in Canvas). This feature is particularly useful if you need to share a recording with individuals outside your Canvas site or with non-MIT participants while ensuring additional security by requiring a passcode.

Note: Only the Zoom Scheduling Host can add or remove a passcode for a Zoom recording.

Add or Remove Passcode Protection

  1. Go to https://mit.zoom.us and login using your MIT Kerberos credentials.
  2. Click Recordings in the Main Menu.
    Click Recordings
  3. In the Cloud Recordings tab, navigate to the recording that needs to be modified and click Share.
    Screenshot of Share Button in Zoom Cloud Recordings
  4. Who can view will allow you to change the general audience of the recording. Selecting the MIT Touchstone option will require the viewer to login with their Kerberos account to view the recording.
    Screenshot of the who can view dropdown
  5. You can also make it so only specific people can view the recording.
    A screenshot of the zoom cloud recording settings with Share with specific people highlighted
  6. Click Share Settings to access the Advanced Panel.
    Screenshot of zoom's cloud recording share settings with another share settings button highlighted
  7. Select the Passcode checkbox, enter a custom passcode, and click Save.
    • Note:
      • Do NOT share your custom passcode.
      • This passcode gets encrypted into the URL that you will use to share this meeting, so participants do not need to know it. This makes your meeting recording more secure.
        Screenshot of passcode protection for a Cloud Recording in Zoom
  8. Click Save.
  9. Click the Close button (X icon) in the top-right corner to return to your list of Cloud Recordings.
    Screenshot of a dialog box for the Zoom recording settings
  10. Repeat Steps 3-9 for each recording you’d like to share.