At a Glance
In this guide, you will learn how to understand, access, and build Custom GPTs through OpenAI.
The emergence of custom Generative Pre-trained Transformers (GPTs) presents an opportunity for exploring new educational methodologies at MIT Sloan. This guide aims to explain custom GPTs, their construction, differences from standard models, and potential applications in MBA education.
Large language models (LLMs) have already revolutionized many aspects of our society, including profound impacts on teaching and learning. These models come pre-trained to be able to execute a broad array of tasks by generating text output to interact with users, and have many general capabilities. However, many of these models lack specific domain knowledge, or are not easily tuned to the specific needs of certain classes of problems. While technical users could fine-tune models to solve this problem, OpenAI (the creator of ChatGPT) has addressed this problem by allowing customizability through custom GPTs with no code needed.
Tip: Creating Custom GPTs requires a paid ChatGPT subscription (Plus or higher). Once created, Custom GPTs can be shared publicly via the GPT Store or a direct link and anyone with a ChatGPT account, including free users, can access and use them.
Understanding Custom GPTs
Custom GPTs are helpful artificial intelligence tools tailored for specific domains or contexts. These GPTs differ from standard chats through ChatGPT due to their custom instructions and ability to keep a knowledge base in addition to what ChatGPT has already been trained on. This allows users to create a custom GPT to address a specific need that might be hard for ChatGPT to achieve on its own. The process of creating a custom GPT requires no code, and instead involves using specific prompts and your own data to provide insights into a particular field.
How Custom GPTs Work:
- Custom GPTs start with a base model that has been pre-trained on a vast array of general data. This is the standard ChatGPT experience.
- The GPT creator provides custom instructions that allow the GPT to behave in more directed ways than standard ChatGPT chats. These instructions can be lengthy, but require no coding or knowledge of prompt engineering to get started.
- The GPT creator can enhance the model by adding to its knowledge base with relevant documents. Uploading data files allows the model to retrieve information from these files when answering prompts, which is useful where ChatGPT’s base model is less strong.
Specialized Datasets Examples:
- Academic course materials, such as syllabi and rubrics
- Anonymized classroom discussion transcripts or online forum posts, capturing the nuances of student inquiries and responses.
- Readings and other documents that you’ve created for courses with a real-world focus
A Motivating Example:
For an International Management Class, imagine a custom GPT with access to a dataset comprising international business strategies, global market trends, and case studies of multinational corporations. This GPT could:
- Facilitate simulations of international market expansion, offering students feedback and analysis.
- Provide insights into case studies by drawing parallels with historical data.
- Engage in interactive Q&A sessions, helping students explore concepts like international trade laws.
Such a GPT could potentially enhance learning and prepare students for managing across borders.
How to Create a Custom GPT
This section outlines the steps to create your own custom GPT.
Step 1: Collect Data
Collect and add the data that you want to include in the GPT’s custom knowledge base. This will require your domain knowledge of the topic for which you plan on orienting your GPT around. You can feed many types of data, including PDF, Text, CSV, HTML, and Excel files, into a GPT’s knowledge base.
Step 2: Interface with the GPT builder:
Follow the guidance on OpenAI Academy’s page Using custom GPTs to create your custom GPT.
Step 3: Iterate
The most important part of creating a custom GPT is iterating with the system until it produces the outputs and behavior that you desire. The GPT builder is meant to adjust the underlying behavior of the model. If you want to see how your GPT actually behaves in its current state, refer to the Preview pane on the right side of the screen.
Imagine you have been talking with the GPT builder to provide instructions about how your model should behave. Now, you can go to the preview pane and actually prompt your current model as the user. You can see how your GPT behaves, and then if some element is not satisfactory, you can go back to the GPT builder in the left pane and ask it to change things until the output is correct. Switching between the builder and preview panes allows for real-time iteration to improve the performance of your GPT.
Note: Anyone using the GPT will be able to download the files in the GPT’s knowledge base.
Below the knowledge section, users will also notice the capabilities section. This allows creators to add in existing features present within ChatGPT to their custom GPT. By checking the boxes, users can add web-browsing capabilities to their GPTs, image generation, or the code interpreter.
The main advantage of the configure tab is the ability to manage the custom instructions or knowledge base of the GPT. Advanced users can add in engineered prompts to the instructions section that allows for specific and detailed direction that might take longer to achieve via natural conversation with the GPT builder. However, a knowledge of prompt engineering or use of the configure tab is not necessary to create a successful GPT.
Step 5: Share Your GPT
When you feel comfortable with the Custom GPT you’ve created, you can save your GPT and share it publicly via the GPT Store or a direct link.
Reminder: Users will need to log into ChatGPT to access your custom GPT.
To create your custom GPT, click the Create button. This will open a menu asking who should be able to access the GPT.
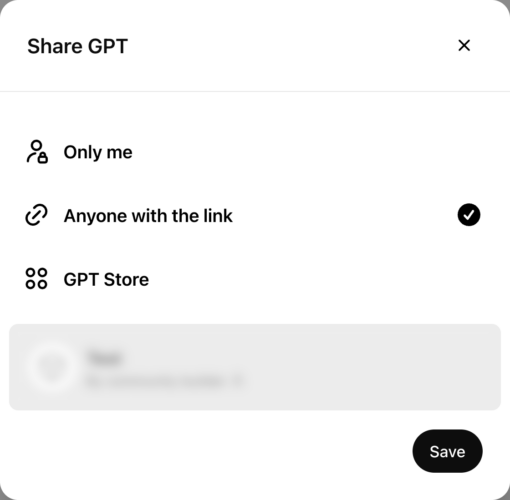
You can choose to publish this GPT so that only you have access to it, anyone with a link has access to it, or anyone in the public who comes across your GPT has access to it. Depending on the nature of your GPT, any of these may be appropriate, but for the purposes of using a GPT for the classroom we recommend having anyone with a link be able to access it.
Once you are ready, click the Save button. Now, the GPT should appear in the sidebar in all future ChatGPT sessions, allowing you to easily access your GPT whenever you want to use it.
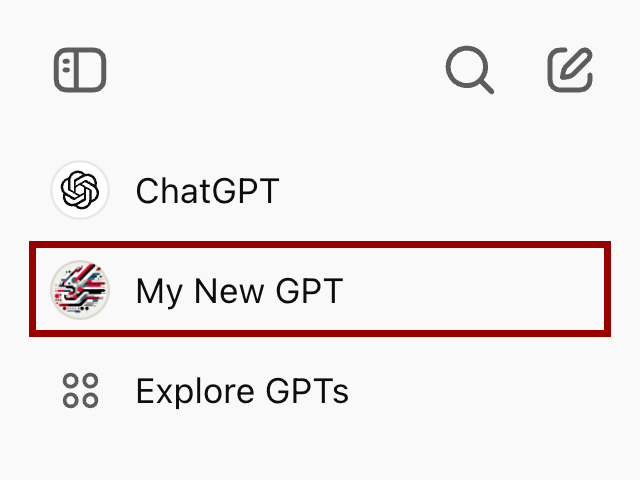
If you want to remove your GPT from the sidebar, just hover over the GPT and click the three dots next to its name, and click hide from sidebar. If you wanted to edit your GPT more, click explore in the sidebar, find your GPT in the My GPTs section, and click the pencil icon next to your GPT to edit.
Example Use Case: Custom GPT as an Interactive Tutor
One potential use case is having a custom GPT act as a tutor to provide personalized feedback to students. The GPT could be trained on datasets like assignments, rubrics, and examples of constructive feedback. You can design the GPT so it goes through steps like gathering assignment details, clarifying rubrics, assessing work, and encouraging reflection and revision.
Benefits:
- Personalized, detailed assignment feedback
- Encourages critical engagement and independent thinking
- Offers scalable mentorship
On his blog, Ethan Mollick shared this prompt he used to create a tutor GPT. Let’s walk through his prompt as you consider potential components of your own GPT.
- Role Definition: The GPT acts as a “friendly and helpful mentor,” focusing on giving specific, concrete feedback. This role is crucial in guiding students towards understanding their strengths and areas for improvement.
- Feedback Process:
- Initial Interaction: The GPT first gathers information about the specific assignment details. This step ensures that the feedback is tailored to the student’s academic context and assignment requirements.
- Rubric or Goal Clarification: By asking for a grading rubric or assignment goals, the GPT aligns its feedback with the instructor’s expectations.
- Student’s Objectives and Concerns: Understanding what the student hopes to achieve and their perceived challenges allows the GPT to provide targeted advice.
- Assignment Review: The GPT reviews the provided assignment, offering balanced feedback that highlights both positives and areas needing improvement. This feedback is annotated directly on the assignment, making it easy for students to understand and apply.
- Encouraging Action on Feedback: The GPT prompts the student to reflect on how they plan to implement the feedback, fostering a deeper engagement with the learning material.
- Follow-up and Iteration: The student is encouraged to seek peer feedback and return with revised work, promoting continuous improvement.
Practical Classroom Application: In an MBA course at MIT Sloan, such as Strategic Management, students could submit their anonymized project drafts to a custom GPT tutor. The GPT would provide structured feedback following a prompt similar to Mollick’s, guiding students through refining their strategic analyses or business plans. This process could enhance their learning and help them learn how to critically assess their own work.
Conclusion
By harnessing the power of custom GPTs, educators at MIT Sloan can significantly enhance the learning experience, offering students cutting-edge, AI-driven educational tools that are deeply aligned with the specificities of their curriculum.


