At a Glance
Peerceptiv provides students with opportunities to give and receive peer feedback. Students can:
- Self-assessment (students evaluate their own contributions)
- Peer assessment (students evaluate teammates within their Canvas groups)
- Team-level assessment (students reflect on overall team performance)
In this guide, you’ll learn how to create a Team Member Evaluation directly in the Peerceptiv tool. This option is best when you want to collect feedback without creating a graded Canvas assignment—the evaluation will not appear in the Canvas Gradebook or on the course calendar.
We’re piloting Peerceptiv in select courses in Spring, Summer, and Fall 2026. This page contains information for courses that are taking part in the pilot program.
Step 1: Create Your Groups in Canvas
If students will be evaluating their teammates and/or their group as a whole, you must first create groups in Canvas (if you haven’t already done so).
Peerceptiv syncs student groups directly from Canvas when you create a Team Member Evaluation assignment. Configure your groups in Canvas before setting up the Peerceptiv assignment to ensure students are automatically matched with their correct teammates.
To create your student groups in Canvas, see:
Step 3: Create Your Course in Peerceptiv (One-Time Setup)
IMPORTANT: You only need to complete this step the first time you create a Peerceptiv assignment in your Canvas site. Once the course is created, you won’t need to repeat this process for additional Peerceptiv assignments in the same Canvas course.
Step 4: Set Up the Team Member Evaluation in Peerceptiv
In this step, you’ll create the Team Member Evaluation in Peerceptiv. Once you complete this step, you’ll choose evaluation and feedback options.
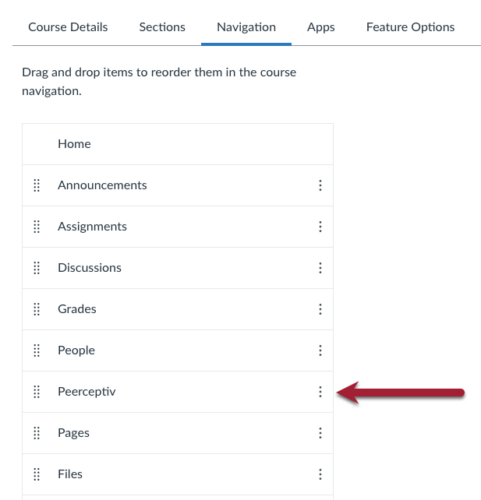
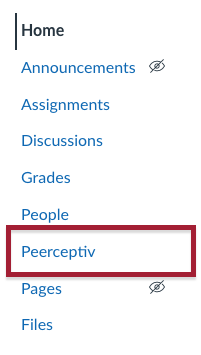
- In your Canvas course, click Peerceptiv in the Course Navigation Menu.
- Click the New Assignment button.

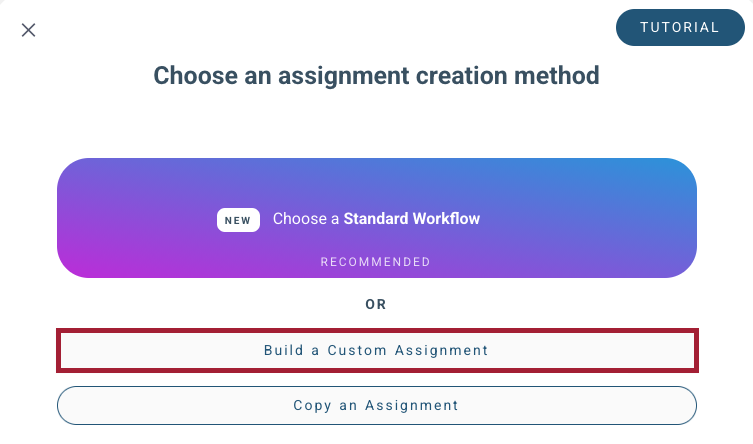
- On the Choose an assignment creation method screen, click Build a Custom Assignment.
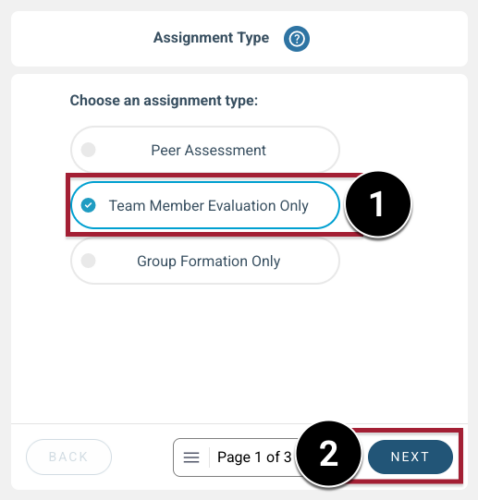
- On the Assignment Type screen, click Team Member Evaluation Only [1], and click Next [2].
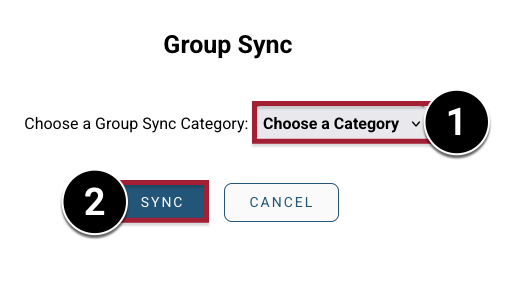
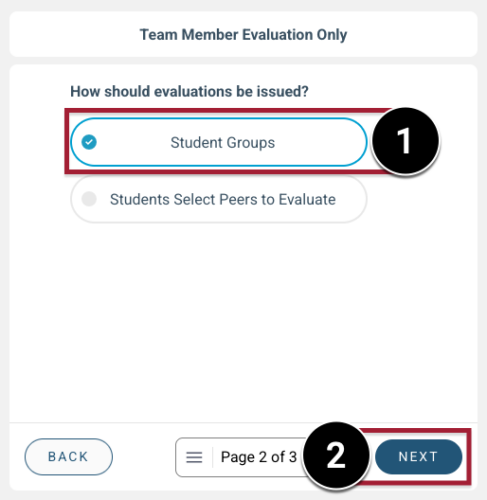
- On the Team Member Evaluation Only screen, click Student Groups [1] and click Next [2].
- Optional: On the Reflection Phase screen, choose if you want students to submit a short written reflection on their received ratings and comments [1] and click Next [2].
- IMPORTANT: Note that this is DIFFERENT from the self-evaluation, which focuses on individual contribution.

- On the Confirm & Continue screen, click Submit.

Step 5: Choose Evaluation and Feedback Options in Peerceptiv
In this step, you’ll configure how your Team Member Evaluation works in Peerceptiv—what students evaluate, how feedback is graded, and how results are shared.
What You Can Include in the Evaluation
You can choose to have students:
- Evaluate their peers within their group
- Evaluate their group as a whole
- Complete an optional self-evaluation
- Give feedback anonymously to encourage honest responses
Configure the Evaluation Options in Peerceptiv
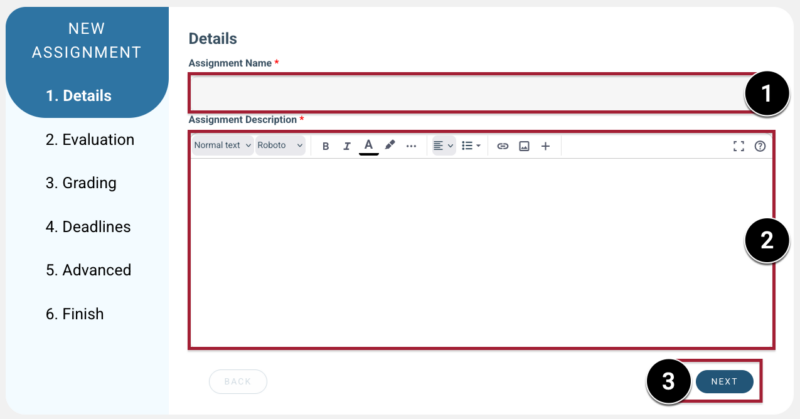
- On the Details screen, enter an assignment name [1], enter a description [2], and click Next [3].
- On the Evaluation screen, choose what students will evaluate [1] and click Next [2].
- Commonly Used Options at MIT Sloan:
- Require students to evaluate their group’s peers (on by default)
- Students rate each teammate individually.
- Require students to evaluate the group as a whole
- Students reflect on how the team perform overall.
- Require students perform a self-evaluation
- Students reflect on their own contributions.
- Evaluators are anonymous
- Hides the names of evaluators so students see only anonymous ratings and comments, which can encourage more candid feedback.
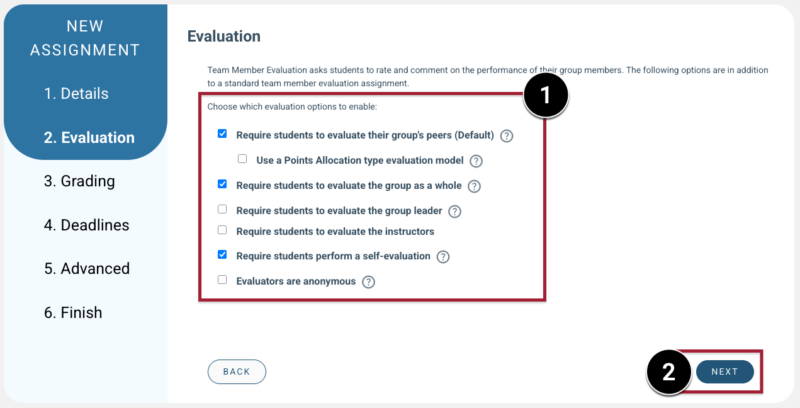
- Other Available Options:
- Use a Points Allocation type evaluation model
- Allows students to evaluate their peers by distributing a finite number of points (100) among their peers based on their performance.
- Require students to evaluate the group leader
- If you assign group leaders, students can evaluate that role.
- Require students to evaluate the instructors
- Students provide feedback on the instructor(s).
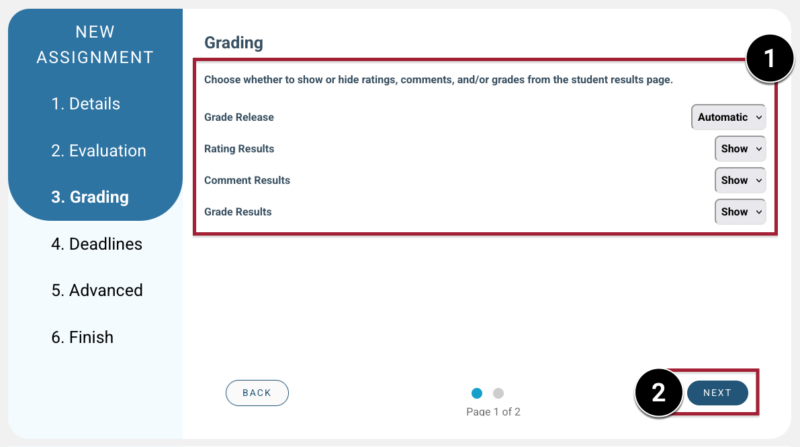
- On the Grading screen, choose whether to show or hide ratings, comments, and/or grades from the Student Results page [1] and click Next [2].
- For Grade Release, choose how feedback and grades will be released to students:
- Automatic Release: Students will see their feedback and grades automatically after the evaluation deadline passes.
- Manual Release: Results are initially visible only to the instructor. You can review ratings and comments before students see them. When you’re ready, open the assignment’s Results tab and manually release the results to students.
- Note: Teaching teams often use Manual Release for Team Member Evaluation assignments so they can review ratings and comments before students see them.
- Select Show or Hide for the following options to control which results students can see after the evaluation deadline passes:
- Rating Results: Numerical ratings from peers
- Comment Results: Written feedback from peers
- Grade Results: The calculated grade for the Peerceptiv activity (you will configure this in Step 4)
- On the Grading screen, choose how the evaluation is graded [1] and click Next [2].
- If you’re not using the points allocation model (which is completion-only), you can decide how grades are calculated. You can base the assignment grade on:
- Completion: Students receive credit for completing all evaluation steps.
- Peer ratings: Grades reflect the feedback students receive from teammates.
- A combination of both: Part completion, part peer ratings.
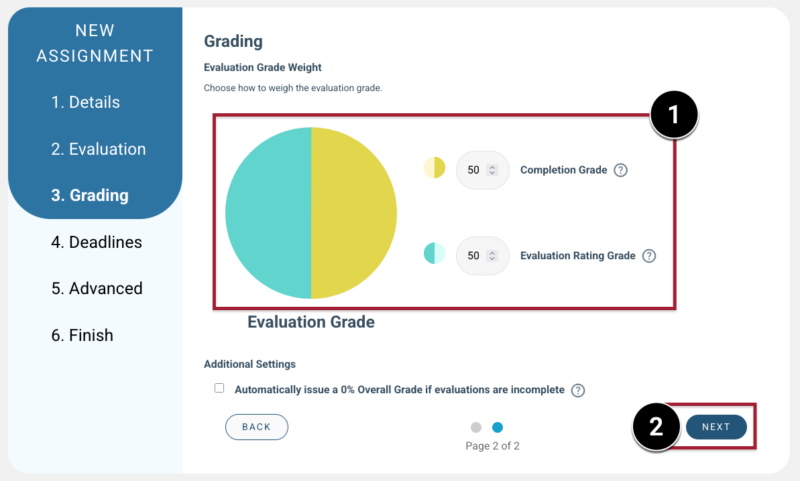
- Optional: You can also choose to automatically assign a zero if a student does not complete all evaluation steps by selecting the Automatically issue a 0% Overall Grade if evaluations are incomplete checkbox.
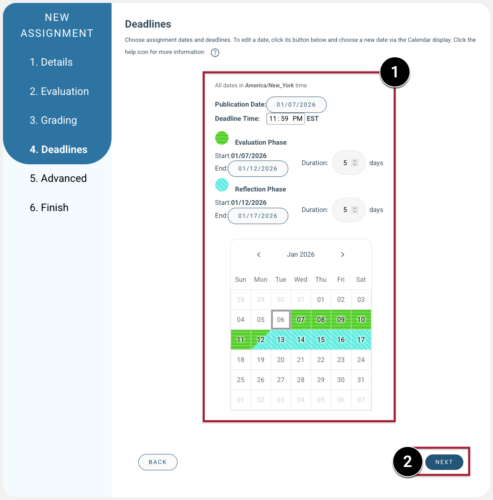
- On the Deadlines screen, choose when the evaluation opens and when students must submit their evaluations [1]. If you enabled the Reflection phase in Step 4, set when students must submit their reflections as well [1]. When finished, click Next [2].
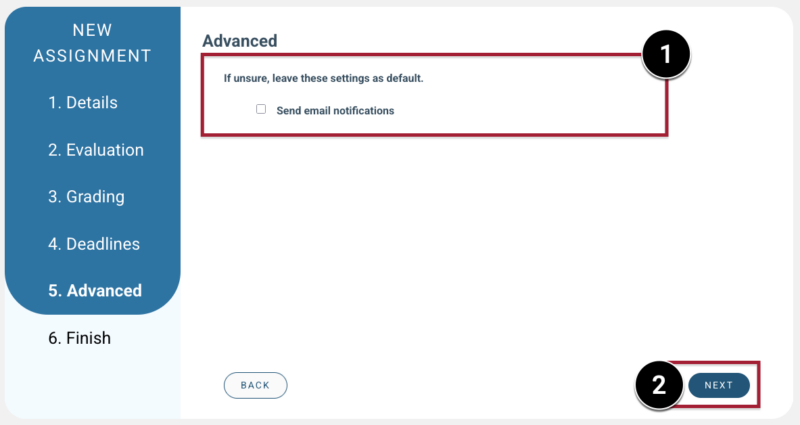
- On the Advanced screen, choose whether you want students to receive email notifications [1] and click Next [2].
- On the Finish screen, click Finish.

- On the Assignment Created screen, click Continue to Dashboard.

Step 6: Set Up the Evaluation Rubric(s) in Peerceptiv
In this step, you’ll choose how feedback is collected—using rating scales, written comments, or both.
If students are evaluating their group members, Peerceptiv automatically adds a default Group Member Evaluation rubric that you can use as-is, edit, or replace with your own. And if you enable self-evaluation, students will use that same rubric to assess their own contributions—no separate setup needed.
What You Can Include in the Evaluation
You can design your rubrics to:
- Use rating questions for scored feedback
- Add open-ended questions for qualitative feedback
- Require written comments along with their ratings
Create or Edit Your Evaluation Rubrics in Peerceptiv
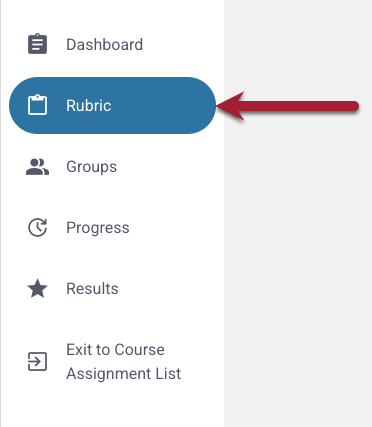
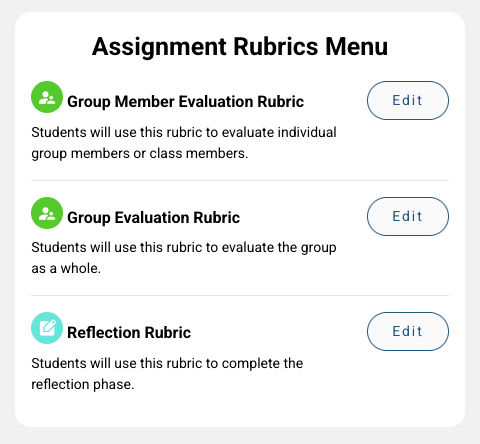
- On your Peerceptiv assignment’s Dashboard, click Rubrics in the Assignment Menu.
- On the Assignment Rubric Menu screen, add a rubric for each evaluation you enabled in Step 4 and Step 5. To create or update a rubric, click Edit.
- For each evaluation, you can customize your rubric prompts in the following ways:
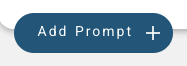
- Add a Prompt: Click Add Prompt to include a new question.
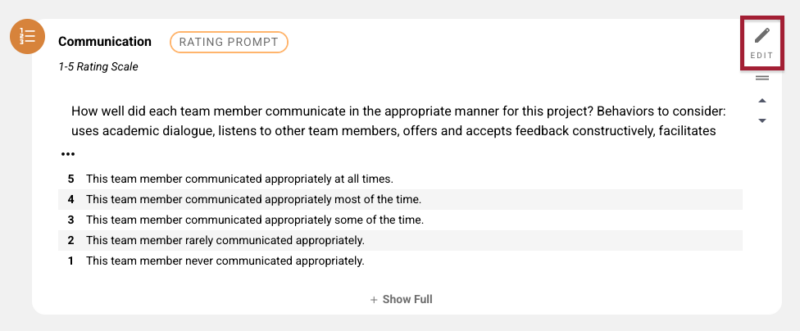
- Edit a Prompt: Click Edit to revise the wording of a question.
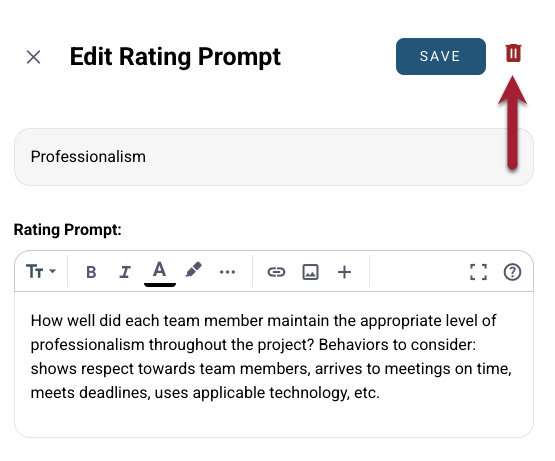
- Delete a Prompt:
- Click Edit for a prompt.
- Click the Trash icon.
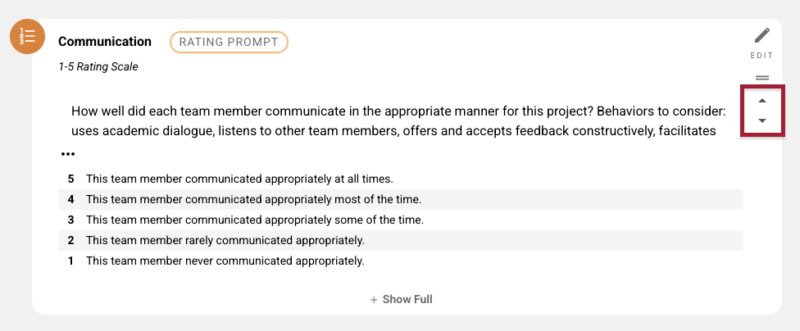
- Reorder Prompts: Use the Up or Down Arrows to change the order.
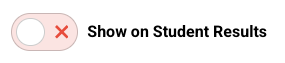
- Hide Results from Students: When this option is enabled, students will not see ratings or comments for that specific prompt on their results page—even if other feedback is shared:
- Click Edit for a prompt.
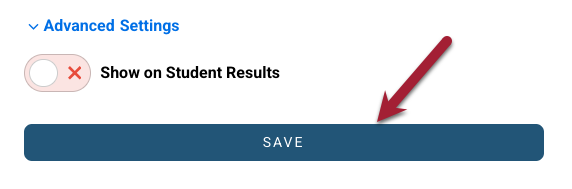
- Click Advanced Settings.

- Turn Show on Student Results off.
- Click Save.
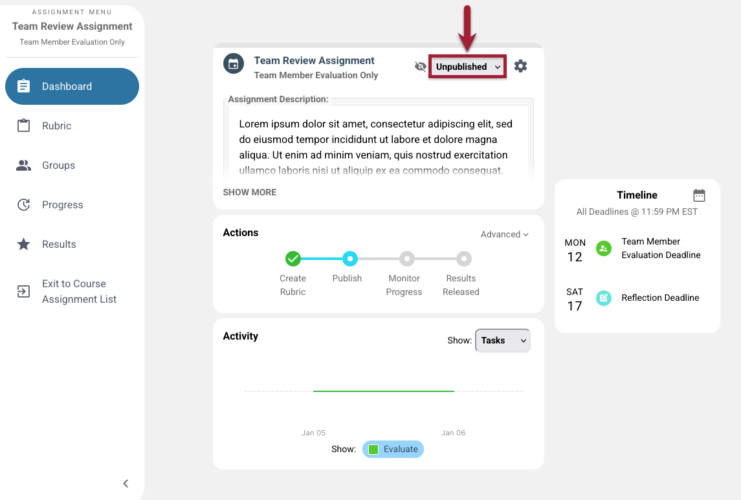
Step 8: Publish the Team Member Evaluation in Peerceptiv
In this step, you’ll publish the evaluation so students can access it.
- On the Peerceptiv assignment’s Dashboard, select Publish.